In this article we will talk about how to get a GIF of excellent quality, and at the same time its weight will not be too large.
Many people encounter a problem when the final animation takes up a lot of space. Many admins don’t skimp on this either; they publish GIFs the size of the Titanic in their communities. We will share our method of creating high-quality, long and light animation.
How to make a GIF for 30 seconds with high resolution and so that it looks very high quality and concise on the feed, and weighs no more than 12 MB. If your gif is not so long, its weight will be even less (3-5 MB).
How to make a GIF like this
If you need to make animation from video cuts, you need to use a video editor. We cut fragments in Movavi VideoEditor.
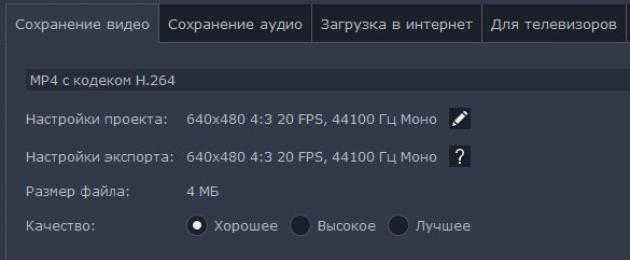
I won’t go into the specifics of using the program; you can find guides online. After finishing cutting, adding animation and effects, save the video:

As you can see, we set a low resolution and good quality. As a result, a 25 second video weighs only 4 MB.
Next, you need to convert the video to gif format. This is where users are faced with the problem of size and quality. We recommend using the online service ezgif.com. I always have it in my bookmarks.
Click on the Video to GIF tab
Upload your video there.

We set the resolution, frame rate, compression method, if the background in the GIF is mostly monochromatic, check the box next to Optimize for static background. Experiment with the parameters and you will find the perfect option for yourself.
BUT That's not all, after conversion the animation is still heavy. Let's go to the GIF Optimizer tab, which appears under our new gif:

Bright photos that can decorate an album and get hundreds of likes on social networks are created not only on the seashore or in an expensive studio. Your own apartment can easily become a backdrop for great photos! Want to learn how to take beautiful photos at home? Read the tips in our article!
How to take a beautiful photo of a house on a smartphone
We will make do with minimal resources - no SLR cameras or professional lighting. Just you, a smartphone and available tools. The techniques that you can use to get high-quality images depend on what exactly you are photographing.
1. Portrait
Shooting from the front (the face looks straight into the camera) often creates flaws even where there were none. Try turning half a turn towards the camera - this is one of the universal options that will suit most people. This angle visually makes the face narrower, emphasizing the cheekbones and slender neck.

Even a slight turn of the head makes the face more attractive in the photo.
Even if you're shooting a portrait where the viewer's attention is focused on the face, don't forget about what's around you. Untidy clothes on a chair or a half-eaten lunch can quickly ruin an attractive picture. Try to have an interesting interior behind you.

Make sure the background is aesthetically pleasing
2. Subject photography
If you like to take photos for Instagram, you will definitely need the ability to photograph small objects. Despite its apparent simplicity, there are plenty of pitfalls here. It is necessary to convey the texture, the smallest details, the exact color. Our tips will help you take a beautiful photo with your smartphone:

For product photography, it’s a good idea to use a small table where the object will be located. If you use natural light, you can sit on the windowsill. It is highly advisable to use a tripod, even if shooting from a phone. This will avoid hand shaking and achieve maximum clarity.
How to make a photo even better
Even a successful photo needs processing. The program allows you to improve the quality of a photo, remove unnecessary things from the frame, retouch a portrait or apply effects. What features does it offer?

The blind area is needed to prevent water from getting under the house. However, most often people build it in order to walk on it. But this is not its main function and purpose.
If there is no blind area, then the water will erode the supporting pillars of the house, which will lead to its destruction and subsidence of the house. How to make a high-quality blind area with your own hands?
Before you do it, you need to find out the size of the roof, or rather, how far the roof extends from the house. After all most of water will drain from the roof. Often these projections are approximately half a meter long. This means the size of the blind area will be equal to one meter, that is, twice as large.

Once all dimensions have been measured and the size of the blind area has been selected, you can begin to manufacture it. First you need to dig a hole about a meter wide along the entire length of the house and about 30 centimeters deep. Next you need to sand it. The work is cumbersome, but very necessary. Creating a so-called sand cushion will allow the blind area to last for many years.
Next, you need to shed the pillow so that the pillow becomes strong and does not collapse when you step on it. After this, we set the guides that will show the boundaries of the blind area. The guides can be made from ordinary boards, but it is better to make them from flat slate, which is not so expensive and is easy to get
Also, the blind area should be divided into several meter-long parts; to do this, we install jumpers between the guides at a distance of one meter. The guides should be installed at an angle of approximately 5-10 degrees.

This is necessary so that water flows away from the house and not towards it. Next, we begin pouring the blind area. It is filled with high strength concrete. To mix concrete you need to use cement, water, crushed stone and sand. It is best to mix it in a small trough to make it more convenient to pour and move it, because you will have to pour it around the entire perimeter of the house. The batch is made in the following proportions: approximately a bucket of water, a bucket of cement, two buckets of sand and four buckets of crushed stone. Mix all this thoroughly and pour. Use a trowel to level the surface so that it is smooth.

Then you need to give the blind area a few days to completely harden.
Good luck in making your own blind area!
We tried to understand all the intricacies of this procedure and answer most of the questions that arise.
Laser hair removal is a medical procedure.
It has its own indications and contraindications, and depending on individual characteristics, it may not give the desired result. This procedure can only be carried out by a specialist with medical education by prior appointment from a physician at a licensed medical center.
If you have already started taking a laser hair removal course or are just choosing where to go, be sure to inquire about the availability of a license to practice medicine and whether there are dermatologists on staff.
In this article, we will look at the laser hair removal procedure in detail, so that everyone can assess for themselves in advance whether this method of getting rid of hair is right for you or not.
Why shouldn't hair grow after laser?
Photo: Depositphotos
The hair on the head still has an obvious pragmatic function. The brain and head require maintaining a constant and comfortable temperature, protection from both hypothermia and overheating.
Therefore, it is better to leave hair on the head; you can get rid of it on all other parts of the body, which is done with great success using laser hair removal.
The purpose of the laser is to remove the hair follicle. They tend to recover, and after some time the hair will still appear until the hairline is completely restored. The period of this restoration is individual and ranges from 1 to 8 years.

Photo: Depositphotos
A laser flash is a narrowly directed beam of light to which the pigment contained in the hair shaft reacts. The most optimal wavelength for absorption by melanin is in the range of 700-800 nm. As a result, melanin heats up along the entire length of the hair and reaches the follicle. In this case, the follicle itself is destroyed.
The depth of penetration under the skin of a laser with this wavelength does not exceed 3 mm. This ideal value in order to reach the hair root and not have a negative effect on the remaining cells of the epidermis.
Depending on the type of laser used, the effect visually manifests itself differently. The Alexandrite laser scorches the hair so much that it almost completely burns out, which makes the procedure feel quite painful, but at the same time the effect of smooth skin occurs immediately after it.
The diode laser does not burn hair, but only destroys the follicle itself, while visible hair remains and falls out within 10-14 days after the procedure.
The darker and thicker the hair, the more melanin pigment it contains. This means that the better it heats up and the more effective laser hair removal will be.
If the hair is very thin and light or already gray, then laser hair removal will not be suitable.
Which laser is better?
The laser must be professional level. All other things being equal, the result will depend much more heavily on the qualifications and experience of the doctor who performs the procedure.
Laser hair removal technology is not a unique “know-how”, the knowledge of which is possessed by any one corporation. These are open and known technologies. Almost any manufacturer can make decent equipment if desired.
The cheapness of equipment is often associated with its service life, and if an organization is aimed at long-term work in the field of cosmetology, then it simply will not invest in poor medical equipment.
Why multiple treatments may be required
The nature of hair is such that its visible amount is only 10-20% of the total number of hair follicles, while the remaining 80-90% are in the stage of no growth. In the non-growth phase, there is most often no hair in the follicle; it has already fallen out, which means there is no conductor for laser energy.
The interval between procedures should be 3-5 weeks. Repeated procedures after 1-2 weeks will not affect the effectiveness. During this time, very little new hair will appear.
It is important to understand that the number of treatments required may vary significantly for each individual. Laser hair removal is essentially a medical procedure. Like any other procedure, it does not provide a 100% guarantee in advance. Depending on the hormonal background and individual predispositions to the appearance large quantity A course of hair treatment can in some cases consist of 12 or even 14 procedures, although most often 6-8 are sufficient.
Preparation for the procedure
At the EPILAS center, the procedure is performed on smoothly shaved skin. But if an alexandrite or other old slow laser is installed in a salon or medical center, then the specialist will not be able to physically treat the entire skin area of the promised area in a reasonable time. In this case, the procedure is carried out only in areas where hair grows, and the doctor, accordingly, needs to see them. Alexandrite lasers tend to have a very small spot size, and non-professional equipment does not large number flashes so that large areas can be treated quickly.
With diode lasers, the procedure is carried out using a contact gel, which improves the glide of the handpiece over the skin and acts as a conductor for the cooling element, due to which the unpleasant sensations almost completely disappear.
The modern MeDioStar NeXT PRO diode laser, which is used in EPILAS, has a working spot size of 10x14 mm and is capable of producing up to 10 flashes per second, which allows you to ignore the presence of hair and quickly and effectively carry out the procedure over the entire surface of the skin without missing not a single plot.
If the hair length exceeds 4-5 mm, the procedure will begin to lose its effectiveness, since the energy from the laser will remain in the body of the visible hair and will not reach its root in sufficient quantities.
After shaving at the beginning of the course, the hair will appear darker and coarser, as its light and fine ends are shaved off. But this is only a visual effect, the hair remains as it was. You need to wait until they fall out after the procedure.
You should not pull out hair during laser hair removal treatment. Violation of this important condition will negate the entire effect of the course of laser procedures. After waxing or sugaring, 2-4 weeks should pass before the first laser procedure for the hair to recover, because they are the conductors of energy from the laser to the follicle.
You must avoid visiting beaches and solariums: sunbathing is prohibited for 2 weeks before and after the procedure. Having a fresh tan significantly increases the risk of getting burned by any type of laser. With alexandrite, a burn after tanning is guaranteed; with diode, the risk increases significantly. It may not necessarily be a classic burn. Pigmentation may occur, which will still not be easy to get rid of.
No professional medical center will take responsibility and will not perform the procedure for a fresh tan. You will not be allowed to sunbathe immediately after the procedure.
Indications and contraindications
Laser hair removal is one of the aesthetic medical procedures, the decision to perform which is often made by the client himself. However, there are cases when this particular method of hair removal may be the only available solution to combat excess hair, while other conventional methods are simply not applicable or extremely ineffective due to the individual characteristics of the organism.
These may be cases of abundant and rapid hair growth on large areas of the body, such as the chest, back, legs, and abdomen. Sugaring procedures and other types of hair removal cause skin irritation or pain. If ingrown hairs or inflammation of the hair appear, laser hair removal is also prescribed.
There are both absolute contraindications to the procedure, in which laser hair removal should never be performed, and relative, when the procedure is permitted, but with mandatory prior consultation with the attending physician.
Absolute contraindications include: oncological or immune diseases, including viral ones, diabetes mellitus and blood leukemia. An absolute contraindication will be individual intolerance, including increased photosensitivity.
Relative contraindications include:
- acute or chronic skin diseases;
- multiple moles in laser treatment areas;
- the presence of burns, cuts, abrasions in laser treatment areas;
- phlebeurysm.
The procedure will be delayed: a fresh tan (less than two weeks), colds, flu, ARVI in the active phase, allergies in the acute stage, a tendency to form keloid scars, pregnancy and breastfeeding, age before the end of puberty and the use of potent drugs.
Very often people are interested in the laser hair removal procedure during pregnancy and lactation, when hormonal levels change and many women begin to grow hair in areas where they have never existed. Such medical equipment has not been tested on pregnant women; this automatically includes pregnancy in the list of contraindications for use.
During periods of hormonal changes, it may not always be wise to use a laser; this also applies to teenage puberty. It is more correct to begin removing follicles with a laser only when the process of their formation and the beginning of activity is completed and the hair is no longer growing larger and larger.
Only highly qualified specialists
Laser hair removal has long been used by a significant part of the population and is not a unique innovation. Its advantages are obvious, and due to its constantly decreasing cost, this service is increasingly replacing outdated methods of depilation.
However, in pursuit of a modern miracle, one should not forget about safety: you should not trust the first salon you come across to carry out this procedure. You need to make sure that the specialists are qualified and that the organization that offers this service has a medical license, and inquire about the presence of a registration certificate for the laser: this is a document that gives medical institutions the right to use equipment on the territory of the Russian Federation.

Photo: epilas.ru
The EPILAS medical center, specializing in hardware cosmetology, operates in strict accordance with the requirements of the legislation of the Russian Federation, the Ministry of Health and Rospotrebnadzor. The procedures are performed only by highly qualified doctors and cosmetologists who have passed the mandatory vocational training for working on laser equipment.
In less than a year of work, more than 10 thousand laser hair removal procedures have already been carried out here, and in the summer they promise to open a second center of a much larger area in Moscow.
Of course, if you have composed one or two songs, then it is better to use a ready-made studio. Many recording studios offer their services. But there are authors who have already written a dozen songs and have plans to continue their work. In this case, it is better to equip a recording studio at home. But how to do that? There are two ways.
First way simple. It includes the minimum of what is needed for a fairly high-quality recording:
- sound card with microphone and line inputs;
- a computer that meets the system requirements of the sound card;
- a sound recording and mixing program installed on a computer;
- headphones;
- microphone cord;
- microphone.
Every musician who understands computer technology will be able to assemble such a system himself. But there is also second, more complicated method. It assumes those studio components that were indicated in the first method, and additional equipment for higher quality audio recording. Namely:
- mixing console with two subgroups;
- audio compressor;
- voice processor (reverb);
- acoustic system;
- patch cords to connect it all;
- a room isolated from extraneous noise.
Now let's take a closer look at the main components for a home recording studio.
In what room should the recording take place?
The room (announcer's room) in which audio recording is planned should ideally be separate from the room in which the equipment will be located. Noise from device fans, buttons, faders can “contaminate” the recording.
Interior decoration should minimize reverberation within the room. This can be achieved by hanging thick rugs on the walls. It is also necessary to take into account that a small room, unlike a large one, has a lower level of reverberation.
What to do with the mixing console?
In order to connect all the devices together and send a signal to the sound card, you need a mixing console with two subgroups.
The remote control is switched as follows. A microphone is connected to the microphone line. From this line a send is made to subgroups (no send is made to the general output). The subgroups are connected to the linear input of the sound card. A signal is also sent from the subgroups to the common output. The linear output of the sound card is connected to the linear input of the remote control. From this line a send is made to the general output, to which the speaker system is connected.
If there is a compressor, it is connected through the “break” (Insert) of the microphone line. If there is a reverb, then the unprocessed signal from the Aux-out of the microphone line is supplied to it, and the processed signal is returned to the console at the line input and sent from this line to the subgroups (no send is made to the general output). The headphones receive a signal from the Aux-out of the microphone line, the computer line and the reverb line.
What happens is this: The following sound picture is heard in the speaker system: a phonogram from a computer, a voice from a microphone and processing from a reverb. The same thing sounds in the headphones, only separately adjusted at the Aux output of all these lines. Only the signal from the microphone line and from the line to which the reverb is connected is sent to the sound card.
Microphone and microphone cord
Key element sound studio is a microphone. The quality of the microphone determines whether a high-quality audio recording will be made. You should choose microphones from companies that make professional equipment. If possible, the microphone should be a studio microphone, since it is the one that has a more “transparent” frequency response. The microphone cord must be symmetrically wired. Simply put, it should have not two, but three contacts.
Sound card, computer and software
As mentioned earlier, for simple operation you need a sound card with a microphone input. This is necessary in order to connect a microphone to a computer without a mixing console. But if you have a remote control, a microphone input in the sound card is not required. The main thing is that it has a linear input (In) and output (Out).
The system requirements of a “sound” computer are not high. The main thing is that it has a processor with a clock frequency of at least 1 GHz and RAM not less than 512 MB.
The program for recording and mixing sound must have multi-track recording. The phonogram is played from one track, and the voice is recorded on the other. The program settings should be such that the track with the soundtrack is assigned to the output of the sound card, and the track for recording is assigned to the input.
Compressor and reverb
Many semi-professional mixing consoles already have a built-in compressor (Comp) and reverb (Rev). But using them for high-quality audio recording is not recommended. In the absence of a separate compressor and reverb, you should use the software analogues of these devices, which are available in a multi-track recording program.
All this will be enough to create a recording studio. With such equipment, there will be no question of how to make a high-quality audio recording.
- In contact with 0
- Google+ 0
- OK 0
- Facebook 0