Determination of azimuth by compass
To determine the azimuth on the ground, you need to:
Face in the direction of the object to which you want to determine the azimuth;
Orient the compass, that is, place its zero division (or the letter C) under the darkened end of the compass needle;
By rotating the compass cover, aim the sighting device at the object;
Against the pointer of the sighting device, facing the object, read the azimuth value.
To determine a given azimuth on the ground, you need to:
Set the pointer of the compass sighting device with a point above the division corresponding to the value of the specified azimuth;
Turn the compass so that the sight pointer is in front;
Turn yourself along with the compass until the zero point coincides with the northern end of the arrow; the direction of the viewfinder pointer will be the direction along the given azimuth.
The alignment of the sighting line with the direction towards the object (target) is achieved by repeatedly moving the gaze from the sighting line to the target and back. It is not recommended to raise the compass to eye level, as the measurement accuracy will decrease. The accuracy of measuring azimuths using Andrianov's compass is plus minus 2 3°.
Azimuth movement
To move along a given azimuth you need to:
Study the area between the starting and final points of movement on a map and outline a route that is easily recognizable by local objects;
Draw the chosen route on the map and determine the azimuths of all route links;
Determine on the map the length of each link of the route in steps (a pair of steps is on average 1.5 m);
Record all movement data in the field book in the form of a table or schematic drawing.
Having arrived at the starting point, you should:
Navigate by compass;
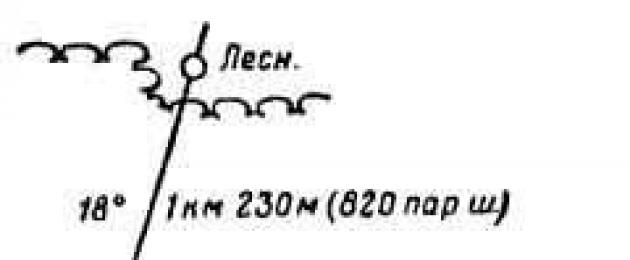
Set the pointer of the moving compass ring against a reference equal to the azimuth of the first link of the route (in our example - 335°);
Smoothly turn the compass until the zero division coincides with the northern end of the arrow; then the sighting device will show the direction of movement in azimuth - 335°;
In this direction, choose some subject and go to it. Having approached the object, you need to check the orientation of the compass and continue the path to the first turning point;
At the first turning point, you need to set the compass azimuth to the next turning point and move to it in the same way as from the starting point.
Determining azimuths on a map with a protractor
First, the landmarks chosen along the route of movement are connected by a straight line, but so that this line intersects at least one of the vertical lines of the kilometer grid.
Then use a protractor to measure the angle from the north direction of the vertical line of the kilometer grid clockwise to the direction towards the object. In this case, the protractor is applied to the vertical line of the kilometer grid so that the mark (dash) on the protractor ruler coincides with the point where the drawn direction intersects the vertical line of the kilometer grid, and the extreme divisions of the protractor (0 and 180) align with the direction of this line.
In the figure, in the direction “barn - ravine” the azimuth is 65°, in the direction “barn - bridge” 274° 080°+94° = 274°).
Magnetic needle deviation or direction correction is the angle between the vertical line of the kilometer grid and the compass needle (magnetic meridian). Data on the declination value of the needle is always given under the southern (lower) side of the map frame in the form of a diagram and text.
Determination of magnetic azimuths
This is done in contrast to the above on an oriented map, taking into account magnetic declination. Magnetic declination is either eastern with a “+” sign or western with a “ ” sign. Knowing the magnitude and sign deviation, it is not difficult to combine the direction of one of the sides of the frame of the map sheet (western or eastern) with the direction of the true meridian.
When the sides of the map frame are aligned with the direction of the true meridian, the map will be oriented accurately.
In practice they do it like this:
Place a compass on one of the sides of the map so that the north-south line of the compass scale coincides with the direction of this side of the frame, and zero (C) on the scale is directed to the north side of the map frame;
Release the brake of the compass needle and, when the needle calms down, turn the map until the needle points to its northern end opposite the zero division (C) of the compass scale;
Rotate the map without moving the compass so that the northern end of the arrow is opposite the division corresponding to the magnitude and sign of declination for a given sheet of the map.
The map oriented in this way is fixed;
Connect the landmarks with straight lines: ravine - barn, barn - stone;
Place the compass on the drawn straight line between the landmark so that the “north-south” line of the scale coincides with this direction, and the zero division (C) is directed in the direction of movement;
When the arrow calms down, count on the scale against the northern end of the arrow; subtract the resulting reading from 360°, this difference will be the magnetic azimuth.
Measuring the distance between landmarks
Measuring the distance between landmarks is done as follows:
Determine the length of segments on the map with a compass or ruler;
Using the map scale, they find out what distance the segments on the ground correspond to;
For example, on a map at a scale of 1:25,000, the measured distance between two landmarks is 6.4 cm. The scale value is 250 m in 1 cm.
The distance will be 250 x 6.4 = 1600 m.
The data necessary for movement is drawn up in a specially designed route diagram, or in the form of a table.
The movement begins by finding the desired azimuth of the direction of movement.
In the direction of movement, it is advisable to select and remember the most distant landmark possible. While moving, the distance traveled is counted (usually in pairs of steps).
If the landmark is not at this point, a sign or one or two fighters are left at the exit point, and the landmark is searched within a radius equal to 0.1 of the distance traveled from the previous landmark.
When moving, additional landmarks are used: power lines, rivers, roads, etc.
Avoiding obstacles, depending on the conditions, can be done in one of the following ways:
If there is visibility through an obstacle:
Notice a landmark in the direction of movement on the opposite side of the obstacle;
Go around the obstacle and continue moving from the noticed landmark, determine the width of the obstacle in any way and add it to the distance traveled;
In the absence of visibility through an obstacle, for example, when going around a forest blockage, as well as in conditions of limited visibility: fog, rain, etc.
Let us assume that the movement was made in an azimuth of 65° and 340 pairs of steps were taken before stopping in front of the obstacle. After studying the area, it was decided to make a detour on the right side. Determine the azimuth of the direction along the obstacle using a compass (from point 1 to point 2), continue moving in this direction, counting the pairs of steps to the right edge of the obstacle. In the figure, the azimuth is 145°, and the distance traveled is 180 pairs of steps. Having made a stop at point 2, use the compass to determine the direction corresponding to the initial azimuth along which the movement was made to the obstacle (65°) and continue to move until leaving the obstacle. Counting in pairs of steps is carried out from point 2 to the stopping point behind the obstacle (point 3). In the figure, the distance traveled is 270 pairs of steps. From point 3, the movement is made to the left along the reverse azimuth of the direction from point 1 to point 2 (in the figure, the reverse azimuth is 325°) until a distance of 180 pairs of steps is covered (in the figure to point 4). At point 4, determine the direction according to the original azimuth (65°) and adding the distance from point 2 to point 3 to the distance traveled to the obstacle, continue moving to a new landmark.
Soldiers need to remember that reverse azimuth differs from direct azimuth by 180 degrees. For example, Am = 330, the return azimuth will be 330 180 = 150 Am = 30, the return will be 180+30 = 210.
Converting the length of each section between landmarks into pairs of steps: from landmark 1 to landmark 2 will be 1200m. 1200: 1.5 = 800 p.s. (1.5 m - average length of 2 pairs of steps).
Drawing a detected object on a map
This is one of the most important moments in the work of a scout. The accuracy of determining its coordinates depends on how accurately the object (target) is plotted on the map. A mistake will cause weapons to fire into an empty area.
Having discovered an object (target), the reconnaissance officer must first accurately determine by various signs what has been discovered. Then, without stopping observing the object and without detecting yourself, put the object on the map.
There are several ways to plot an object on a map.
Visually: an object is plotted on the map if it is located near a known landmark.
By direction and distance: orientate the map, find your standing point on it, indicate on the map the direction to the detected object and draw a line, determine the distance to the object, plot this distance on the map from the standing point. The resulting point will be the position of the object on the map. If it is graphically impossible to solve the problem in this way (the enemy is in the way, poor visibility, etc.), then you need to accurately measure the azimuth to the object, then translate it into a directional angle and draw on the map from the standing point the direction at which to plot the distance to the object. To obtain a directional angle, you need to add the magnetic declination of a given map to the magnetic azimuth (direction correction).
Straight serif. In this way, an object is placed on a map of 2 x 3 points from which it can be observed. To do this, from each selected point, the direction to the object is drawn on an oriented map, then the intersection of the lines determines the location of the object.
Determination of coordinates and target designation
To indicate the approximate location of an object on the map, it is enough to indicate the grid square in which it is located. The square is always indicated by the numbers of kilometer lines, the intersection of which forms the southwestern (lower left) corner. When indicating the square of the map, the following rule is followed: first they call two numbers signed at the horizontal line (on the western side), that is, the “X” coordinate, and then two numbers at the vertical line (the southern side of the sheet), that is, the “Y” coordinate. In this case, “X” and “Y” are not said. For example, enemy tanks were spotted. When transmitting a report by radiotelephone, the square number is pronounced:
"eighty eight zero two."
If the position of a point (object) needs to be determined more accurately, then full or abbreviated coordinates are used.
Working with full coordinates. It is required to determine the coordinates of the road sign in square “8803” on a map at a scale of 1:50,000. First, determine the distance from the lower horizontal side of the square to the road sign (600 m on the ground). In the same way, measure the distance from the left vertical side of the square (500 m). Now, by digitizing kilometer lines, we determine the full coordinates of the object. The horizontal line has the signature “5988” (X), adding the distance from this line to the road sign we get: X = 5988 600. We determine the vertical line in the same way and get 2403 500. The full coordinates of the road sign are as follows: X = 5988 600 m, Y = 2403 500 m. Abbreviated coordinates: X = 88 600 m, Y = 03 500 m.
Another variant. The data of the Disguised Command Post (CCP) is known: X = 90,850, Y = 02,550. We carry out the calculation:
1. First, we determine the square in which the object is located.
2. We set aside 850 m along a vertical line, and from this point we draw a horizontal line.
3. Now we set aside 550 m from the horizontal line below and draw a vertical line. The intersection of the lines will be the desired ZCP.
A special coordinateometer is manufactured: a square with two mutually perpendicular scales. Labels on the scales show the number of hundreds of meters on the map scale. This square is used both when determining coordinates on the map and when plotting objects on the map.
The position of the target in the square is specified in two ways:
According to the “snail” - the square is divided into 9 parts, which are designated by numbers, a number specifying the location of the object inside the square is added when indicated to the designation of the square, for example: ZKP - 5015 and 7;
By letter - the square is divided into 4 parts, which are designated by letters, for example, mortar battery 4016 B.
Determining distances on the ground
Very often a scout needs to determine distances to various items on the ground, as well as estimate their size. Distances are most accurately and quickly determined using special instruments (rangefinders) and rangefinder scales of binoculars, stereo scopes, and sights. But due to the lack of instruments, distances are often determined using improvised means and by eye.
The simplest ways to determine the range (distances) to objects on the ground include the following: - by eye; - by linear dimensions of objects; - by visibility (discernibility) of objects; - by the angular magnitude of known objects: - by sound.
By eye - this is the simplest and quick way. The main thing in it is the training of visual memory and the ability to mentally lay down a well-imagined constant measure on the ground (50, 100, 200, 500 meters).
Having fixed these standards in memory, it is not difficult to compare with them and estimate distances on the ground.
When measuring distance by successively mentally setting aside a well-studied constant measure, one must remember that the terrain and local objects seem reduced in accordance with their distance, that is, when removed by half, the object will seem half as large.
Therefore, when measuring distances, the mentally plotted segments (measures of terrain) will decrease according to the distance.
The following must be taken into account:
The closer the distance, the clearer and sharper the visible object seems to us;
The closer an object is, the larger it appears;
Larger objects appear closer than small objects located at the same distance;
A brighter colored object appears closer than a dark colored object;
Brightly lit objects appear closer to dimly lit ones at the same distance;
During fog, rain, twilight, cloudy days, when the air is saturated with dust, observed objects seem further away than on clear and sunny days;
The sharper the difference in color between the object and the background against which it is visible, the more reduced the distances appear; for example, in winter a snow field seems to bring the darker objects on it closer;
Objects on flat terrain seem closer than on hilly terrain, distances defined across vast expanses of water seem especially shortened;
Folds of the terrain (river valleys, depressions, ravines), invisible or not fully visible to the observer, conceal the distance;
When observing while lying down, objects appear closer than when observing while standing;
When observed from bottom to top - from the base of the mountain to the top, objects appear closer, and when observed from top to bottom - further away.
When the sun is behind the scout, the distance disappears;
shines into the eyes - it seems larger than in reality;
The fewer objects there are in the area under consideration (when observed through a body of water, a flat meadow, steppe, arable land), the shorter the distances seem.
The accuracy of the eye gauge depends on the intelligence of the scout. For a distance of 1000 m the usual error ranges from 10 to 20%.
By linear dimensions. To determine the distance using this method, you need to:
Hold a ruler in front of you at arm's length (50-60 cm from the eye) and use it to measure in millimeters the apparent width or height of the object to which you want to determine the distance;
Divide the actual height (width) of an object, expressed in centimeters, by the apparent height (width) in millimeters, and multiply the result by 6 (a constant number), to obtain the distance.
For example, if a pole 4 m high (400 cm) is closed along an 8 mm ruler, then the distance to it will be 400 x 6 == 2400; 2400: 8 == 300 m (actual distance).
To determine distances in this way, you need to know well the linear dimensions of various objects, or have this data at hand (on a tablet, in notebook). The reconnaissance officer must remember the dimensions of the most frequently encountered objects, since they are required and for the angular measurement method, which is the main method for reconnaissance officers with the naked eye, the distance to targets (objects) can be approximately determined by the degree of their visibility. A scout with normal visual acuity can see and distinguish some objects from the following maximum distances indicated in the table. It must be borne in mind that the table indicates the maximum distances from which certain objects begin to be visible. For example, if a scout saw a pipe on the roof of a house, this means that the house is no more than 3 km away, and not exactly 3 km. It is not recommended to use this table as a reference. Each intelligence officer must individually clarify this data for himself.
When determining distances by eye, it is advisable to use landmarks whose distances are already precisely known.
By angular value. To apply this method, you need to know the linear size of the observed object (its height, length or width) and the angle (in thousandths) at which this object is visible.
Then the distance to the observed object is determined by the formula: P = Bx100/U, where P is the distance to the object; B is one of the linear quantities; Y is the angle at which the linear magnitude of the object (object) known to the observer is visible; 1000 is a constant coefficient.
For example, the height of a railway booth is 4 meters, the scout sees it at an angle of 25 thousandths (the thickness of a little finger). Then the distance to the booth will be 4 x 1000 = 4000 divided by 25, that is, 160 meters. Or a scout sees a Leopard 2 tank at a right angle from the side. The length of this tank is 7 meters 66 centimeters. Let's assume that the viewing angle is 40 thousandths (the thickness of the thumb). Therefore, the distance to the tank is 191.5 meters.
To determine the angular value, you need to know that a segment of 1 mm, distant from the eye by 50 cm, corresponds to an angle of two thousandths (written: O02). From here it is easy to determine the angular value for any segments. For example, for a segment of 0.5 cm the angular value will be 10 thousandths (0 10), for a segment of 1 cm 20 thousandths (0 20), etc. The easiest way is to memorize the standard values of thousandths:
Angular values (in thousandths of distance)
Name of items Size in thousandths
Thumb thickness 40
Index finger thickness 33
Middle finger thickness 35
Little finger thickness 25
Cartridge width 12
Sleeve across body width 18
Simple pencil 10 11
Matchbox length 60
Matchbox width 50
Matchbox height 30
Match thickness 2.
Orientation by sounds
At night and in fog, when observation is limited or impossible at all (and in very rough terrain and in the forest both at night and during the day), hearing comes to the aid of vision.
Scouts must learn to determine the nature of sounds (that is, what they mean), the distance to the sources of sounds and the direction from which they come. If different sounds are heard, the scout must be able to distinguish them from one another. The development of such an ability is achieved through long-term training (in the same way a professional musician distinguishes the voices of instruments in an orchestra).
Almost all sounds that indicate danger are made by humans. Therefore, if a scout hears even the faintest suspicious noise, he must freeze in place and listen. It is possible that an enemy is hiding not far from him. If the enemy starts moving first, thereby giving away his location, then he will be the first to die. If a scout does this, the same fate will befall him. In the same way, an inexperienced or impatient hunter reveals his presence to the animal he is hunting. A skilled hunter surpasses animals with his endurance.
On a summer night, even an ordinary human voice in an open space can be heard far away, sometimes half a kilometer. On a frosty autumn or winter night, all kinds of sounds and noises can be heard very far away. This applies to speech, steps, and the clinking of dishes or weapons. In foggy weather, sounds can also be heard far away, but their direction is difficult to determine. On the surface of calm water and in the forest, when there is no wind, sounds travel a very long distance. But the rain greatly muffles the sounds. The wind blowing towards the scout brings sounds closer and away from him. It also carries sound away, creating a distorted picture of the location of its source. Mountains, forests, buildings, ravines, gorges and deep hollows change the direction of sound, creating an echo. They also generate echoes and water spaces, facilitating its spread over long distances.
The sound changes when its source moves on soft, wet or hard soil, along the street, along a country or field road, on pavement or soil covered with leaves. It must be taken into account that dry soil transmits sounds better than air. Therefore, they listen by putting their ear to the ground or to tree trunks.
Average range of audibility of various sounds during the day on flat terrain, km (summer)
Sound source Sound audibility Characteristic sound features (enemy actions)
The noise of a moving train 10
Locomotive or steamship whistle, factory siren 7 10
Burst shooting from rifles and machine guns 5
Shot from a hunting rifle 3.0
Car horn 2 3
The tramp of horses at a trot on soft ground 0.6
on highway 1.0
Human scream 1 1.5
Horses neighing, dogs barking 2 3
Spoken speech 0.1 0.2
Splash of water from oars 0.25 0.5
Clinking of pots, 0.5 spoons
Crawling 0.02
Infantry movement in formation:
on the ground 0.3 Smooth dull noise on the highway 0.6
The sound of oars on the side of the boat 1 1.5
Digging out trenches by hand 0.5 1 Hitting rocks with a shovel
Driving in wooden spears: Thumping sound evenly by hand 0.3 0.6 alternating blows mechanically 0,8
Chopping and felling trees: Sharp knock of an ax, manually (with an ax) 0.3 0.4 squeal of a saw, intermittent with a chainsaw 0.7 0.9 knock of a gasoline engine, thud of a tree falling 0.8 1.0 on the ground of a cut tree
Vehicle movement: Smooth noise on a dirt road 0.5 motors on the highway 1 1.5 Sharp noise
Movement of tanks, self-propelled guns, infantry fighting vehicles: engines on the ground 2 3 simultaneously with the sharp metallic clang of tracks along the highway 3 4
Engine noise of a standing tank, BMP 1 1.5
Movement of towed artillery: A sharp, jerky sound along the highway 1 2 the rumble of metal and 2 3 the noise of engines
Artillery battery firing 10 15
(division)
Shot from gun 6
Mortar firing 3 5
Shooting from large caliber 3
machine guns
Machine gun shooting 2
Single shot from a 1.2 rifle
At night, sounds are well transmitted through the ground. There are certain ways to help you listen at night, namely: - lying down: put your ear to the ground;
Standing: lean one end of the stick against your ear, rest the other end on the ground;
Stand slightly leaning forward, shifting the center of gravity of the body to one leg, with a half-open mouth - the teeth are a conductor of sound.
A trained scout, when sneaking up, if only his life is dear to him, lies on his stomach and listens while lying down, trying to determine the direction of the sounds.
This is easier to do by turning one ear in the direction from which the suspicious noise is coming. To improve hearing, it is recommended to apply bent palms, a bowler hat, or a piece of pipe to the auricle. To better listen to sounds, a scout can put his ear to a dry board placed on the ground, which acts as a sound collector, or to a dry log dug into the ground. If necessary, you can make a homemade water stethoscope. To do this, use a glass bottle (or metal flask), filled with water up to the neck, which is buried in the ground until the water level in it. A tube (plastic) is tightly inserted into the cork, onto which a rubber tube is placed. The other end of the rubber tube, equipped with a tip, is inserted into the ear. To check the sensitivity of the device, hit the ground with your finger at a distance of 4 m from it (the sound of the impact is clearly audible through the rubber tube).
When learning to recognize sounds, it is necessary to reproduce with educational purpose following:
1. Extraction of trenches.
2. Dropping sandbags.
3. Walking on the boardwalk.
4. Hammering the metal pin.
5. Sound when the shutter of the machine gun is operating (when opening and closing it).
6. Putting a sentry on duty.
7. The sentry lights a match and lights a cigarette.
8. Normal conversation and whispers.
9. Blowing your nose and coughing.
10. The sound of breaking branches and bushes.
II. Friction of a weapon barrel against a steel helmet.
12. Walking on a metal surface.
13. Cutting barbed wire.
14. Mixing concrete.
15. Shooting from a pistol, machine gun, machine gun with single shots and bursts.
16. Engine noise of a tank, infantry fighting vehicle, armored personnel carrier, vehicle in place.
17. Noise when driving on dirt roads and highways.
18. Movement of small military units (squad, platoon) in formation.
19. Dogs barking and yelping.
20. The noise of a helicopter flying at different altitudes.
Location orientation
To navigate the area means to find the directions to the cardinal directions (north, south, east and west) and determine your location.
To find the direction according to the cardinal points, first determine the north-south direction; after which, facing north, the determiner will have to the right - east, to the left - west.
The cardinal directions are usually found using a compass, and in the absence of one, using the Sun, Moon, stars and some signs of local objects.
By compass
Using a compass, you can most conveniently and quickly determine north, east, south, west. To do this, you need to give the compass a horizontal position, release the arrow from the clamp, and let it calm down. Then its dark end will be directed to the north.
To determine the accuracy of the deviation of the direction of movement from the direction to the north or to determine the positions of terrain points in relation to the direction to the north and counting them, divisions are marked on the compass, of which the lower divisions are indicated in degrees (the smallest division is 3°), and the upper divisions of the protractor in tens of thousands. Degrees are counted clockwise from 0 to 360°, and protractor divisions are counted counterclockwise from 0 to 600°. The zero division is located at the letter “C” (north), and there is also a triangle glowing in the dark, which replaces the letter “C” in some compasses. Under the letters “E” (east), “Y” (south), “Z” (west) there are luminous dots.
On the movable cover of the compass there is a sighting device (sight and front sight), against which luminous indicators are mounted, which serve to indicate the direction of movement at night.
The most common compass in the army is the Andrianov system and the artillery compass.
Andrianov's compass allows you to make readings in degrees and thousandths. The inscriptions on the fixed scale of degree divisions (division value 3°) are given clockwise every 15°, and thousandths - in reverse direction after 500 thousandths (5 00). The sighting device is movable.
The artillery compass is graduated only in thousandths with a division value of 100 thousandths (1 00) clockwise. The sighting device is stationary, and the scale (dial) rotates, which allows, without changing the position of the compass, to quickly align the zero division of the dial with the northern end of the magnetic needle. The mirror on the hinged lid allows you to control the orientation of the compass and count along the dial when sighting on an object.
A sports compass is very convenient for use by scouts, the needle of which is placed in a special liquid, so it quickly calms down and almost does not fluctuate when moving.
(?), ... systems management... and I.M. Zarutsky(cm. ...
Azimuth is the angle formed between the direction towards any terrain object and the direction to the north.Azimuths are counted from 0 to 360° clockwise.
So, in Fig. 1 azimuths will be:
On a deciduous tree 50°
To factory pipe 135°
To the road sign 210°
On coniferous wood 330°
Determination of azimuth by compass
To determine the azimuth on the ground, you need to:
stand facing in the direction of the object to which you want to determine the azimuth;
orient the compass, that is, place its zero division (or the letter C) under the darkened end of the compass needle;
by rotating the compass cover, aim the sighting device at the object;
Against the pointer of the sighting device facing the object, read the azimuth value.
To determine a given azimuth on the ground, you need to:
set the pointer of the compass sighting device with a point above the division corresponding to the value of the specified azimuth;
turn the compass so that the sight pointer is in front;
- turn yourself along with the compass until the zero point coincides with the northern end of the arrow; the direction of the viewfinder pointer will be the direction along the given azimuth.
The alignment of the sighting line with the direction towards the object (target) is achieved by repeatedly moving the gaze from the sighting line to the target and back. It is not recommended to raise the compass to eye level, as the measurement accuracy will decrease. The accuracy of measuring azimuths using Andrianov's compass is plus or minus 2-3°.
Azimuth movement

To move along a given azimuth you need to:
study on the map the area between the starting and final points of movement and outline a route that is easily recognizable by local objects;
draw the chosen route on the map and determine the azimuths of all route links;
determine on the map the length of each link of the route in steps (a pair of steps is on average 1.5 m);
write down all data for movement in the field book in the form of a table or schematic drawing
Having arrived at the starting point, you should:
navigate by compass;
set the pointer of the movable compass ring against a reference equal to the azimuth of the first link of the route (in our example - 335°);
smoothly turn the compass until the zero division coincides with the northern end of the arrow; then the sighting device will show the direction of movement in azimuth - 335°;
in this direction, select an object and go to it. Having approached the object, you need to check the orientation of the compass and continue the path to the first turning point;
At the first turning point, you need to set the compass azimuth to the next turning point and move to it in the same way as from the starting point.
Determining azimuths on a map with a protractor
First, the landmarks chosen along the route of movement are connected by a straight line, but so that this line intersects at least one of the vertical lines of the kilometer grid. No rice. 196, the direction "barn - ravine" crossed the kilometer line marked 61, and the direction "barn - bridge" crossed the line marked 60.
Then use a protractor to measure the angle from the north direction of the vertical line of the kilometer grid clockwise to the direction towards the object. In this case, the protractor is applied to the vertical line of the kilometer grid so that the mark (dash) on the protractor ruler coincides with the point where the drawn direction intersects the vertical line of the kilometer grid, and the extreme divisions of the protractor (0 and 180) align with the direction of this line.

In the figure, in the direction "barn - ravine" the azimuth is 65 °, in the direction "barn - bridge" 274 ° (180° + 94° = 274°).
Magnetic needle deviation or direction correction is the angle between the vertical line of the kilometer grid and the compass needle (magnetic meridian). Data on the declination value of the needle is always given under the southern (lower) side of the map frame in the form of a diagram and text.
Determination of magnetic azimuths
This is done in contrast to the above on an oriented map, taking into account magnetic declination. Magnetic declination is either eastern with a “+” sign or western with a “-” sign. Knowing the magnitude and sign of the deviation, it is not difficult to combine the direction of one of the sides of the frame of the map sheet (western or eastern) with the direction of the true meridian (Fig. 197). When the sides of the map frame are aligned with the direction of the true meridian, the map will be oriented accurately.
In practice they do it like this:
install a compass on one of the sides of the map so that the north-south line of the compass scale coincides with the direction of this side of the frame, and the zero (C) on the scale is directed to the north side of the map frame;
release the brake of the compass needle and, when the needle calms down, turn the map until the needle points to its northern end opposite the zero division (C) of the compass scale,
rotate the map without moving the compass so that the northern end of the arrow is opposite the division corresponding to the magnitude and sign of declination for a given map sheet (in the figure, the map is oriented at declination - 10, west);
the map oriented in this way is fixed;
connect landmarks with straight lines: ravine - barn, barn - stone;
set the compass on the drawn straight line between the landmark so that the “north-south” line of the scale coincides with this direction, and the zero division (C) is directed in the direction of movement;
when the arrow calms down, count on the scale against the northern end of the arrow; subtract the resulting reading from 360°, this difference will be the magnetic azimuth.


Measuring the distance between landmarks
Measuring the distance between landmarks is done as follows:
determine the length of segments on the map with a compass or ruler;
using the map scale, they find out what distance the segments on the ground correspond to;
For example, on a map at a scale of 1:25,000, the measured distance between two landmarks is 6.4 cm. The scale value is 250 m in 1 cm.
The distance will be 250 x 6.4 = 1600 m.
The movement begins by finding the desired azimuth of the direction of movement. In the direction of movement, it is advisable to select and remember the most distant landmark possible. While moving, the distance traveled is counted (usually in pairs of steps).
If the landmark is not at this point, a sign or one or two fighters are left at the exit point, and the landmark is searched within a radius equal to 0.1 of the distance traveled from the previous landmark.
When moving, additional landmarks are used: power lines, rivers, roads, etc.
Avoiding obstacles, depending on the conditions, can be done in one of the following ways:
If there is visibility through an obstacle:
notice a landmark in the direction of movement on the opposite side of the obstacle;
bypass the obstacle and continue moving from the noticed landmark, determine the width of the obstacle in any way and add it to the distance traveled;
In the absence of visibility through an obstacle, for example, when going around a forest blockage, as well as in conditions of limited visibility: fog, rain, etc.
Let us assume that the movement was made at an azimuth of 65 ° and 340 pairs of steps were taken before stopping in front of the obstacle (in Fig. 198 this is point 1.) After studying the area, it was decided to make a detour on the right side. Determine the azimuth of the direction along the obstacle using a compass (from point 1 to point 2), continue moving in this direction, counting the pairs of steps to the right edge of the obstacle. In the figure, the azimuth is 145° and the distance traveled is 180 pairs of steps. Having made a stop at point 2, determine by compass the direction corresponding to the initial azimuth along which the movement was made to the obstacle (65 °) and continue to move until leaving the obstacle. Counting in pairs of steps is carried out from point 2 to the stopping point behind the obstacle (point 3). In the figure, the distance traveled is 270 pairs of steps. From point 3, movement is made to the left along the reverse azimuth of the direction from point 1 to point 2.
Bypassing obstacles in azimuths

in the figure, the back azimuth is 325 °) until a distance of 180 pairs of steps is covered (in the figure to point 4). At point 4, determine the direction according to the original azimuth (65 °) and adding to the distance traveled to the obstacle the distance from point 2 to point 3 (Fig. 198 this is 340 pairs of steps + 270 pairs of steps) they continue moving to a new landmark.
Soldiers need to remember that reverse azimuth differs from direct azimuth by 180 degrees. For example, Am = 330, the return azimuth will be 330 - 180 = 150. am= 30, the return will be 180 + 30 = 210.
Converting the length of each section between landmarks into pairs of steps: from landmark 1 to landmark 2 will be 1200 m. 1200: 1.5 = 800 p.s. (1.5 m is the average length of 2 pairs of steps).
Drawing a detected object on a map
This is one of the most important moments in the work of a scout. The accuracy of determining its coordinates depends on how accurately the object (target) is plotted on the map. A mistake will cause fire from weapons in an empty area.
Having discovered an object (target), the reconnaissance officer must first accurately determine by various signs what has been discovered. Then, without stopping observing the object and without detecting yourself, put the object on the map.
There are several ways to plot an object on a map.
Visually: an object is plotted on the map if it is located near a known landmark.
By direction and distance: orient the map, find your standing point on it, indicate on the map the direction to the detected object and draw a line, determine the distance to the object, plot this distance on the map from the standing point. The resulting point will be the position of the object on the map. If it is graphically impossible to solve the problem in this way (the enemy is in the way, poor visibility, etc.), then you need to accurately measure the azimuth to the object, then translate it into a directional angle and draw on the map from the standing point the direction at which to plot the distance to the object. To obtain a directional angle, you need to add the magnetic declination of a given map to the magnetic azimuth (direction correction).

Drawing an object on a map using a straight line
Straight serif. In this way, an object is placed on a map of 2-3 points from which it can be observed. To do this, from each selected point the direction to the object is drawn on an oriented map, then the intersection of the lines determines the location of the object (Fig. 199).
Orientation is the process of establishing your coordinates on a map. Most often determined using a compass and map. With sufficient knowledge - about the stars, the sun, improvised means (watches, homemade compasses). Azimuth is the angle between north and a point on the map. Determining azimuth will be needed in terrain orientation skills. This skill can be especially relevant when hiking or cycling in the mountains, forests, as well as in various extreme situations.
What is magnetic azimuth
This is a certain angle between the north found on the map, compass and the route point to which you need to arrive. Magnetic azimuth is always determined clockwise on the compass. In order for the compass to give correct readings, you need to move away maximum distance from magnetic objects that can give incorrect readings of the north, that is, initially set the route incorrectly.
How to determine azimuth using a map and compass
- In order to determine the azimuth, you will need a working compass and a map of the area.
- Azimuth covers all 360 degrees at compass marks along clockwise direction arrows.
- First you need to choose the right direction in which the movement will occur. The azimuth angle is calculated from it.
- The person faces the direction of the landmark. Holds a map and compass in front of you.
- The compass needle is held on the brake. This brake should be released so that the magnetized needle finds the north pole on its own. It is not recommended to stand near iron structures or have iron objects on you while working with the compass. There is a high probability that the compass needle will give incorrect readings.
- The compass lies on the map, and its north marks coincide with the map marks.
- Sets your location and the selected landmark.
- Next, the viewfinder is used. With its help, it is fixed on the compass the right direction which should be followed.
- The angle between the arrow pointing north and the landmark point will be called azimuth.
- A compass with a built-in ruler and a locking device for the selected direction will be very convenient and more correct.
- Route determination may vary in accuracy.

How to determine azimuth - movement along azimuth
- To do this, you need to inspect the selected area along the route. Determine how best to move so as not to lose sight of your landmarks. It might be worth doing a little reconnaissance.
- For convenience, the route is marked on the map with a thin dotted line.
- The progress of the movement is noted on a separate piece of paper.
- When the movement has reached the next milestone, you should select the next landmark and also make notes on the progress sheet.
- The compass readings get confused from time to time. Don't forget to update your compass settings when you reach a point.


How to determine azimuth - landmarks
There are three types of landmarks: point, linear and area. Very noticeable, lonely trees, pillars, and windmills can serve as point landmarks. The point is constantly static, without moving. If we're talking about about larger-scale orientation, then these could be settlements, forests, lakes, such landmarks are called areal. There are also linear landmarks - roads, groves, forests, running in length and not in width.
It is very important to notice the correct landmarks for yourself even in the daytime. If it's getting close to evening, it's better to think about parking and overnight accommodation. There is a huge chance of getting lost when moving at dusk. Selected landmarks for better memorization are marked on the progress sheet.
It is not always possible to continue moving in a straight line. Therefore, notes are made of all possible movements, including deviations. The compass is reconfigured for each subsequent section. Scheme of actions on the way: pillar – setting – tree – setting.

A very important skill will be to correctly indicate targets on the ground or map. This skill is especially important if you need to transmit data via communication (walkie-talkie) to determine your location relative to another person. The right landmark can also help competitors find the right areas indicated on a given plan.
Determining the azimuth helps in orientation on the ground, allows you to maintain direction and not go astray while traveling through the plains, taiga and other places where there are no landmarks. Suitable for driving in the dark, in bad weather conditions, when visibility is very low.
How to find azimuth with a map in theory
You can determine the azimuth using topographic map(calculate the true meridian) or a compass (find the magnetic meridian). When combined, these meridians form an angle called magnetic declination. To find the true azimuth, you must first calculate the magnetic one using a compass and add the eastern magnetic declination to the resulting value, or subtract the western declination. It is determined using a reference book, read on the map if it is indicated.
Calculating azimuth from a map helps determine direction not only for travelers on the ground. This method is used to calculate the route for aircraft and ships. Establish a movement trajectory for ground transport in the steppes, deserts, savannas, where there are no direction signs and other landmarks.
It is not difficult to determine the azimuth on the map; it is the angle between the meridian and the direction to the place of arrival. On the map, trying to be as accurate as possible, mark the point of your location. This will be the starting coordinate for constructing the route.
Determining the azimuth allows you to create the route most suitable for the characteristics of each area. If there are no natural or artificial obstacles on the intended route, then the movement is straightforward. If obstacles appear, the route is adjusted as necessary, and the movement follows a broken trajectory.
Creating a route using azimuth and map
To create a route in azimuth and determine the trajectory of movement, you must have:
- large-scale topographic map;
- ruler;
- pencil;
- protractor, it is preferable to choose a transparent one.
To determine the azimuth on the map, the points of the present location and the final destination are indicated. A ruler is applied to the map. Draw a connecting line between the points with a pencil, crossing the meridians closest to the points. The base of the protractor is applied to the meridian, its arc should be directed towards the landmark (end point). The central mark must be aligned with the drawn line. You can determine the azimuth at the intersection of the drawn line and the arc of the protractor by taking readings in degrees.
When determining the route, take into account the obstacles encountered that need to be avoided (deep ravines, swamps, lakes, various buildings). Turning points along the entire length of the route are marked on the map and connected. Points are placed near natural and artificial landmarks in order to better control the consistency of the route. For each segment it is necessary to find the azimuth using the method described above. If the transition is carried out at night, then reference points are placed on the map more often.
How to determine magnetic azimuth
Magnetic azimuth is the angle between the final (defined) point of the route and the direction to the north. Determination of azimuth by compass done like this:
- Stand strictly in the direction of the point of movement (object).
- The compass is placed on a flat surface no higher than chest level, or held in front of you on an outstretched palm.
- The compass is oriented by aligning the dark end of the magnetic needle with the letter C.
- A thin stick (match) is placed on the center of the compass. Its end is directed towards the designated point. The stick is turned clockwise, preventing it from moving from the center.
- Under the stick, on the dial, they look at the digital value.
You can determine the azimuth within the entire circle; its value sometimes reaches 360 degrees. An azimuth with such an angle is considered zero.

Additionally you can find azimuth using a map and compass:
- The compass is placed on the side edge of the map.
- The card is turned until the top edge coincides with “C”, and the side edge of the card coincides with the direction of the dark end of the magnetic needle.
- Two points are marked on the map - the starting point and the ending point, and connect them with a line.
- The compass is moved until its center aligns with the starting point.
- The drawn line will coincide with the digital value of the compass.
This method allows you to find the direct magnetic azimuth. For better orientation on the ground, drawing up a route for return, and calculating the return azimuth. To do this, 180 degrees are subtracted or added from the resulting straight line if the found angle is greater or less than the unfolded angle, respectively.
In a similar way, azimuth is determined using a compass without a map, but in this case you need to imagine conventional points and images in your mind, looking at the surroundings from a higher point.
Azimuth movement with obstacles
When the azimuth route has impassable obstacles , then you should adhere to the following rules:
- On the opposite side of the obstacle, choose the most memorable landmark that runs in the direction of movement.
- Determine the azimuth for the detour.
- If there is no suitable landmark on the back side, you need to mark one in place. To do this, make a notch on the tree trunk and stick a large stick into the ground.
- Go around the obstacle, find the intended landmark. From there, continue moving in azimuth, having previously checked the direction.
In case of zero visibility, the obstacle is avoided using a compass, if a route has not been drawn up on the map before. In front of a difficult area, it is necessary to determine the azimuth to bypass it. Mentally mark the point from which they will start moving. It is important to maintain linearity when moving along and count the number of pairs of steps.

Having reached the end of the obstacle, you need to turn and determine the azimuth using the compass. They continue to move further, count pairs of steps, and maintain linearity. Having completely gone around the obstacle, they return to the original trajectory of movement - calculate the return azimuth, observe the number of pairs of steps from the beginning of the detour to the turning point. After returning to the route, they continue in the direction planned to the obstacle.
How to find azimuth according to the sun
There are situations when it is necessary to navigate the terrain and there are no available means other than a wristwatch. In this case, you need to know how determine the azimuth of the sun using the dial:
- The watch is placed on a flat surface, clockwise pointing towards the sun.
- A line is drawn from the center of the dial through “1”, and the resulting angle is divided in half.
- The drawn bisector indicates the north-south direction. Before noon, north is to the left of the sun, after noon to the right. Therefore, before 12 o'clock the azimuth calculation is done by counting the values counterclockwise, after 12 o'clock they count clockwise.
- The route is drawn up by analogy with a compass.
This allows you to determine the direction of movement with small errors. The azimuth of the sun is measured in degrees from the south to the point on the horizon where the luminary is located at different periods of time - before noon in the east, after noon in the west.

Information for orientation consists of three elements: directions, distances and landmarks (objects) located on the ground.
Landmarks can be any noticeable local objects that stand out among other local objects, are clearly visible even from afar and are striking at close range.
Wherever a person is on Earth, at any given moment he always has space around him: a really visible or imaginary, but still really existing circle - the horizon line.
People noticed on this circle, i.e. There are several special points on the horizon line. They noticed that all the stars in the sky were slowly circling, and one seemed to be standing in one place above the horizon. She was called the North Star. Then people discovered the property of some objects in a suspended state (that is, in a state of freedom of behavior) to always turn one end in the direction of this star. And so gradually four points appeared on the circle of the horizon - north, east, south and west.
With the help of the North Star or with the help of special magnetized objects (compass needles), a person can, being at any point on the surface of our planet, first determine the direction to the main point of the horizon - north, and then, facing it, find the right on the sides of his body east, south behind, and west to the left.
The circle of the horizon is divided into small, equal segments with a total of 360 pieces: approximately according to the number of days in the circle of time - a year. Each segment was called the word “degree” and given its own serial number - from one to three hundred to sixtieth.
Thus, it turned out that each quarter of the circle contained 90°.
The counting of degrees begins from the point of the horizon circle that is located exactly under the North Star, and is carried out from this zero point only to the right.
An angle is a figure formed by two rays emanating from one point. Each degree of a circle (and even fractions of it) is an angle, since if two straight lines are drawn from the center of the circle to the ends of the degree, then this will be a figure consisting of two rays that start from one point.
For a simple geometric angle, both rays are arbitrary, i.e. they can have any direction in space and the angle will remain an angle. And at the angle called azimuth,
one ray is special - it can have only one in space the only direction- on North. If this ray is given any other direction, the azimuth becomes simply an angle. In addition, in geometry, internal angles can be up to 180° (rotated angle), and azimuths can be even larger - from zero to 360°.
Therefore, azimuth is the angle formed by the direction to the north (the first ray) and the direction to the landmark - the target (the second ray). Azimuths are measured in degrees and counted from zero only clockwise (Fig. 111).
On the horizon line we mark not only the four main points and the directions to them from the center - north (N), east (E), south (S) and west (3), but also intermediate ones, i.e. located midway between two adjacent main directions. For example, between the directions to C and B, you can draw an intermediate direction at an angle of 45°, the name of which will be composed of the names of two neighboring directions - northeast. The same intermediate direction can be constructed in each quarter of the horizon circle, and then a so-called azimuthal ring will be obtained, on which we will also mark auxiliary directions at angles of 22.5°. Their names will also be composed of the names of neighboring directions: north-northeast (NNE), northeast-east (NEE), southeast-east (SEE), etc. (Fig. 112).
An experienced tourist, having determined the direction to the north, will find any other direction to the sides of the horizon without a compass, both day and night, in both good and bad weather. To do this, you need to know the azimuthal ring well.
Azimuth measurement. Azimuth is an angle, and all sorts of angles can, firstly, be measured, and secondly, constructed. You can measure and construct angles not only with a pencil on paper, but also with a sighting beam directly on the ground.
On paper (on a map) it is quite possible to measure and plot azimuths with an ordinary goniometer instrument - a protractor (Fig. 113).
 There are many vertical lines on the map - the western and eastern edges of the frame, grid lines rectangular coordinates, which are directed to the north (north-south direction). True, the vertical lines of the kilometer grid are often not entirely parallel to the vertical frames of the map - they form a certain angle between themselves, but this angle is not very large and can be ignored.
If, for example, it is necessary to measure the azimuth of the route line from point A to point 2>, you need to place the center of the protractor (zero point) exactly on point A, rotate one of the axes of the protractor so that it is strictly parallel to the vertical orienting lines of the map, and remove reading on the degree scale of the protractor. But you need to remember that on a regular protractor the degree scale is given in half a circle (180°) and therefore not at every position (rotation) of the protractor on the map you can trust the numbers on its scale - it is often necessary to make corrections, remembering the azimuthal ring (Fig. 114).
How to measure azimuth on the ground to some landmark? A compass will help here, whose magnetic needle, as soon as we release the brake clamp, will automatically turn one end towards the North Pole, which is what is needed: after all, azimuth is an angle with one ray - the direction to the pole.
A compass is a goniometric device that is used to measure magnetic azimuths on the ground (not on paper, on a map, but in space).

 |
Compasses come in different designs, but the most widespread in our country is the compass designed in the 19th century. Russian military topographer Captain Pyotr Adrianov. This compass is called Adrianov’s compass. Previously, these compasses were made entirely of metal (brass), but are now made of plastic.
Adrianov's compass (Fig. 115) consists of five parts: 1 - compass body; 2 — sighting ring; 3 - magnetic needle; 4 — dial (dial); 5—clamp.
The round plastic case (the bottom of the compass) serves to connect and secure all other parts. At the bottom, in the very center of the body, there is a short steel needle embedded into it, onto which the arrow is mounted. On the side there are two slots (ears) for threading a strap, with which the compass, like a watch, is tightened on the hand, or a cord, on which the compass can be hung around the neck. There is another slot on the side; the arrow lock spring passes through it.
Along the upper edge there is a groove with brass springs, with the help of which the sighting ring is attached to the body and rotates on it.
The sighting ring with glass embedded in it has two protrusions along the upper edge - an eye and a front sight, under which on the inside of the ring under the glass there are two triangular protrusions coated with a glow-in-the-dark composition. These protrusions-indicators, when turning the sighting ring, show a reading in degrees on the compass scale (on the dial).
The most important part of the compass is the magnetic needle. It is cut from a thin steel plate and has a special shape in Adrianov’s compass (see Fig. 115). The northern end of the arrow is also covered with a glow-in-the-dark composition. In order for the arrow to rotate easily on the needle, a tiny crystal stone is located in the center of it in a special brass frame (cup) to reduce the braking effect of the rotating parts. This lens has a cone-shaped depression on the lower side, the top of which the arrow rests on the needle and rotates on it.
The fourth part - the compass dial is a white ring with divisions. The limb resembles an azimuthal ring. There is one long stroke on it, covered with a luminous composition (luminous mass) - this is the zero-trich of the limb, i.e. the beginning of the countdown of divisions on the limb. There are also three glow-in-the-dark dots and letters above them: point B - east, point Y - south, point 3 - west. One dial division of Adrianov's compass is equal to 3°. When we turn the sighting ring, the azimuth indicator, located under the front sight, will stand at one or another division of the dial, and it is not difficult to calculate at what degree the indicator is positioned, i.e. what angle from north it shows.
The last, fifth part of the compass - the clamp (arrest) is a springy metal plate bent in half. When we push it out through a slot in the body, both ends of the plate are compressed and release the compass needle; at the same time, the lens “sits” on the needle. When, on the contrary, we push the clamp inside the compass, the petals of the spring spread out, remove the arrow from the needle and press it against the glass: the compass is closed, the arrow does not work.
In recent years, almost all tourists have been using a sports liquid compass, which is much easier and more convenient to work with. The needle of such a compass is placed in a capsule filled with a special liquid that allows the needle to point north within a few seconds. The dial of a sports compass (and there are many models) has a more accurate division value than the dial of Adrianov’s compass - up to 2°. The capsule is located on the compass board, which has a measuring ruler. There are parallel lines on the capsule and on the compass board, which make it easier to work with the map.
In Fig. 116 shows one of the “Universal” compass models: a rectangular board with red lines applied to it for taking azimuth and various scales. A bulb with a bright red and white arrow with the letter N at the northern end rotates freely in the board. A strong magnet does not demagnetize over time. This compass has very high characteristics in terms of speed and needle stability. To take the azimuth, a digital dial of the bulb with a division value of 2° and several parallel lines at the bottom of the bulb are also used. Compass fixed
It can be worn on the wrist or hung around the neck with a cord. The board and bulb are made of impact-resistant materials and are designed to work in tough conditions. climatic conditions(-20...+50°С).
The compass requires careful handling in accordance with the rules:
1) protect the compass from impacts, especially liquid ones, the body of which has the shape of a plate and is therefore very fragile;
2) avoid proximity to large metal objects (axe, saw) that are dangerous for the compass needle;
3) wear a compass on a cord around your neck and, at times when it is not needed, tuck it into your storm jacket pocket or simply in your bosom.
Working with a compass. There are four compass actions that every hiker should know.
1. Finding the sides of the horizon. You just need to open the lock, and the end of the arrow will show the direction to the north. And the task is completed: once you know where north is, you can easily find all other sides of the horizon by remembering the azimuthal ring.
2. Orientation of the map by compass. To orient the map to the sides of the horizon means to rotate it so that the vertical orienting lines of the map become parallel to the axis of the compass needle and the upper end of these lines is directed in the same direction as the northern end of the magnetic needle points.
You need to place the compass on the map so that the western or east side map frame, open the arrow, let it settle, and then smoothly rotate the map sheet along with the compass until the frame line and the arrow axis are on the same straight line. We need to ensure that they are exactly on the same straight line, and the top of the map is facing north. Now the map is located correctly in relation to the sides of the horizon, it is oriented to the north, and from it you can take ready-made directions to any local objects from the observer’s standing point.
3. Straight cutting is an action when the guide, knowing the azimuth in advance, marks passage landmarks along this azimuth and moves in their direction to reach the target.
4. Resection is an action when a conductor, seeing a distant landmark-target and knowing in advance that it will soon disappear from view, determines the magnetic azimuth to it using a compass, and then, by means of direct intersections, reach the target through a series of passages located one after another landmarks
Consequently, two cases are possible: the first - when we have absolutely no overview of the area, but have the exact magnetic azimuth of the target (we took it from the map), and the second - when we have an overview of the area and see the target landmark we want to come to (we are standing on high hill, and there is a forest around), but we know that during movement the target will hide from us, and for a long time. In both cases, we will have to follow the azimuth (along straight lines), but in the first case we will get the azimuth from the map, and in the second - by sighting on the target.
A straight notch for Adrianov's compass is done as follows:
1) set the front sight indicator to the dial division corresponding to our azimuth;
2) open the arrow, let it calm down, orient the compass dial along the arrow, i.e. by rotating the body, we bring the zero stroke of the dial under the northern end of the arrow;
3) we sight, i.e., squinting one eye, we look through the slot of the eye at the front sight and notice in the distance some object that has fallen on the front sight (which has become a passing landmark);
4) without changing the position of the compass, we check whether we performed steps 2 and 3 accurately. Close the compass needle.
After this, you can move to a passing landmark, but you must not lose it: in the forest, your sighting beam will rest against some tree, which is accepted as a passing landmark. This tree must be remembered well so as not to be confused with other trees. As such passing landmarks, you should try to select the most distant objects on the sighting beam, since, having reached them, you will again have to repeat the direct notch (sight), and this operation takes a lot of time.
Resection - determining the azimuth to a visible landmark - is performed in the following order:
1) the compass needle opens and the dial is approximately (not very accurately) oriented along the arrow (a zero line is applied to the northern end of the arrow), and the front sight of the sighting ring, turning it, is directed approximately (also not yet absolutely accurately) in the direction of the landmark;
2) the dial is finally (accurately) oriented along the arrow, and, while sighting, the front sight is adjusted exactly to the landmark;
3) a check is made to see if the zero stroke has gone astray from the northern end of the arrow; if you make a mistake, repeat step 2;
4) a countdown is taken along the dial, i.e. it is determined on which division the front sight indicator is located - how many degrees it turned out to be. The arrow closes.
Direct notching when using a liquid compass is done as follows:
1) place the compass on the map so that its side edge touches the original and end points movements;
2) rotate the rotating part of the body so that its marks become parallel to the magnetic meridian on the map; in this case, the double mark on the movable part of the body should face north (Fig. 117);
3) after this, you need to remove the map and, holding the compass horizontally, turn so that the northern end of the arrow stops between the double line on the compass body; the center line of the plate will indicate the direction of movement. There is no need to notice the landmark while moving, you just need to make sure that the arrow is always between the double marks, which guarantees maintaining the azimuth while moving. Unlike a conventional liquid compass, it keeps the direction not only while walking, but even while running; You just need to learn to hold the compass horizontally.
The azimuth to a visible landmark (resection) when using a liquid compass is taken as follows:
1) holding the compass horizontally, we direct the axial or lateral edge of the compass body towards a landmark;
2) then rotate the compass capsule until the arrow is between the double line and points to 0° (north). Let's look at how many degrees are indicated on the compass dial opposite the center line.
The resulting azimuth should be written down in a notepad. Now, knowing the azimuth to the target landmark, we can safely enter the forest and, making straight cuts, move in azimuth through the alignment of the passage landmarks to the intended target.
However, one must always remember that every person, when working with a compass, can make a mistake: mix up the ends of the arrow, inaccurately orient the dial, or inaccurately sight an object. And a mistake can be costly.
The fact is that the needle of Adrianov’s compass is very mobile and it is difficult to accurately set it on the same line with the zero stroke of the dial. For greater accuracy, it is better to place the compass on some kind of support, stand: on a stump, on a stick stuck in the ground - and yet you always need to play it safe - make notches with not one person, not one, but two compasses. Each conductor on duty must always have a backup: the two of them must make each crossing at the same time. If both results agree, everything is fine. If the results differ slightly (by 5-10°), you can then take the average value. If both answers do not coincide at all, everything needs to be redone.
Movement on a hike can be conditionally divided into two ways: strictly according to azimuth without a map (hard azimuth) and movement according to the situation (along roads, paths, clearings, etc.), when the group is additionally guided by the general approximate direction of movement, the so-called guiding azimuth .
On the way, very often it is impossible to move along the sighting beam, as various obstacles interfere: wetlands, water barriers, steep descents and ascents, thicket areas of the forest. In this regard, the main tactical technique movement in azimuth consists of alternately alternating deviations from the azimuthal course: if some obstacle is avoided on the right, then when bypassing the next one, the left option is selected. After each detour, it is necessary to adjust the further direction of movement.
When moving in azimuth, a theoretical deviation of 3° from a given azimuth results in a displacement of the exit point by 5% of the length of the path traveled along the azimuth (for 1 km of azimuth travel the error is 50 m), but in practice this value is more significant. Therefore, when moving, it is recommended to lay the azimuthal course in separate sections through intermediate landmarks.
12. Determine the side of the horizon by the sum of azimuths: 135° + 45° +180°—90°.
13. The observer reports: “Right in front of me I see a factory with a chimney, on the right is a triage point, and on the right behind me I see a farm. The lake is located exactly to the north. If you turn to face it, the farm will be behind you.” Determine the azimuth to the plant with the pipe and to the trig point.
- In contact with 0
- Google+ 0
- OK 0
- Facebook 0